|
My 500 series PowerBook's display wobbles slightly, is this bad? - Yes, this is
bad. Depending how much it wobbles and how long it has been doing this it is a very serious
problem, it can crack the plastic casing around your PowerBook's screen which is $100 (U.S.)
part to replace. Yes, you have to replace the whole case for the screen, not just the front
cover which is affected the most.
What exactly is the problem? - There are two screws under a plastic cover at
the base of the screen (the same that covers the built in microphone) that are sunken into
the plastic of the back cover for the screen. These screws attach the front cover (by two
tabs) to the back cover and connect through the screen hinges. When you open and close the
screen the stress on these screws causes them to loosen over time and will eventually break
the little tabs off of the front cover for the screen. As I mentioned earlier, you must can't
buy just a new front cover you have to buy the whole case that covers the screen (which costs
around $100 U.S. dollars). Apple's not always as smart as they could be.
Can I fix this myself? - Yes, remember that you are dealing with the area and
delicate electronics around the screen, so if you would prefer to spend the money to have
somebody fix it for you then please do.
What tools will I need? - The following is a list of the tools that I needed
when I repaired my PowerBook 520:
- One (1) Torx 8 screw driver
- One (1) wide, flat tool (I used a guitar pick)
- Two (2) Number 4 flat washers (get a few of the smaller sizes too)
- One (1) small file (jewlers or fingernail file)
How should I prepare to fix it? - The following is a list of steps that you
should take to prepare your workspace and PowerBook for the task at hand:
- Set up your PowerBook on a clean desk or table
- Drain the electricity from within your PowerBook
- Make sure it is off (not just in sleep mode)
- Plug in the AC adaptor and plug it into your PowerBook
- Take out any batteries
- unplug the AC adaptor from your PowerBook then the electrical outlet
- Open the lid as far as possible (so that it is lying horizontal, but open)
- Set something under the lid to support it (books work fine)
- Lay out your tools and these instructions on your workspace (you don't want to risk
creating more static electricity by moving around a lot while working on your PowerBook)
- Set up a humidifier or kettle of boiling water at your workspace (this helps prevent
the build up of static electricity in the air)
- Wash your hands (this releases static electricity from your body)
- Don't work on a floor with a rug! (If you must, wear shoes with rubber soles)
Now, how do I actually fix it? - Please take care while performing the
following steps in repairing your PowerBook:
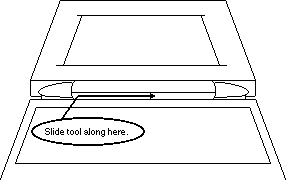
- Remove the Display Access Cover - The display access cover is attached
to the rest of the display casing by some little tabs, in this step you need to disengage
those tabs so that you may remove the display access cover. To do this, take your
wide, flat tool and insert it into the slit along the bottom of the display casing
(Figure 1). Then slide it gently along the slit to separate the display access cover
from the rest of the display casing and carefully disengage each of the tabs as you
come to them. Once this has been completed, you may simply lift off the display
access cover.
 |
| Figure 1 |
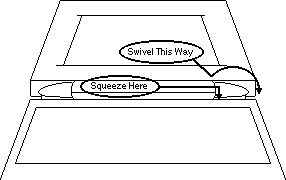
- Remove the two Clutch Covers - The clutch covers (those bullet shaped
things at the ends of the screen hinge) cover the screwn on the ends of the hinges,
you do not really need to check them, but I have included this step so that you know
how to remove them correctly. To do this, you need to squeeze at the base of the
clutch cover (Figure 2) then rotate up and out (Warning: the right-hand clutch
cover also contains the delicate interconnect cable so be careful). The reason that
you have to swivel the clutch covers up and out when you remove them is that they
have tabs on the ends which you want to try not to break off.
 |
| Figure 2 |
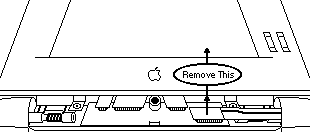
- Disconnect the Interconnect Cable - To access one of the two screws
that need to be checked you will need to disconnect the Interconnect Cable from the
Interconnect board. To do this, you need to lift evenly on the connector (Figure 3)
so as not to bend the pins, then move it out of the way so that you see the screw
which is hidden underneath the cable.
 |
| Figure 3 |
- Check The Screws - Now you should check the screws. First, start by watching
the screws while you open and close the display so you can see how loose they are. If
you think that the screws underneath the main case for the screen need to be tightened
then do the following step two, otherwise skip them.
- Remove The Screen Bezel Screws, Speaker Cable, and Microphone* - To remove the screen bezel you will need to remove
four screws, two are at the bottom (the ones that go through the tabs), and the other
two are at the top (behind the two rubber bumpers). To remove the rubber bumpers just
pry them out with your finger nails or something. You will also need to disconnect
the thin film cable which connects the stereo speakers (it's the far left one; see
Figure 4) and remove the microphone from it's holder.
 |
| Figure 4 |
- Remove The Screen Bezel - To remove the screen bezel you will need to "gently
pry off the lid with some downward movement of the bezel" as Joe Kudrna wrote. I did
not find this to work exactly as I had expected on my PowerBool 520, but it is the
closest I can explain it (sorry, no diagram for this, if you figure out an easy way
to do it then Contact me and I'll do a diagram).
- Tighten The Screws - Now is the time when you should tighten all of the screws
you feel are too loose. Be careful, you must remember that many of the screws are
sunken into plastic, so if you tighten them too much you will strip out the hole and
you will need to replace the back part of the screen's case. If the plastic tabs at
the base of the bezel are cracked or broken then you will need to use one of the
No. 4 washers to prevent additional stress on the tab.
- Put It All Back Together - All you have to do to put it back together is to
follow these steps back in reverse order.
Where can I find more info on this subject? - This is based on an article on
the PowerBook 500 Hinge Page,
but last time I checked it was no longer around. I do have a printout of that page and a 500
series PowerBook, so if you have additional questions or comments feel free to
Contact me.
|


