

"Only qualified service personnel should open the computer's main unit. The Macintosh SE contains extremely high-voltage components that retain an electrical charge, even after the unit is switched off".Voltages at the back of the monitor tube really can give you a nasty shock. Also, it is easy to break the monitor yoke in this and other compact Macs. Cracking the fragile nipple-end of the CRT can cause the vacuum tube to implode, sending glass shards everywhere. And getting a new monitor for compact Macs can be a pain.
If you want to risk it, here goes....
Obviously, disconnect your SE from the mains, and leave it for at least an hour. If it's been disconnected for several hours or overnight, so much the better.
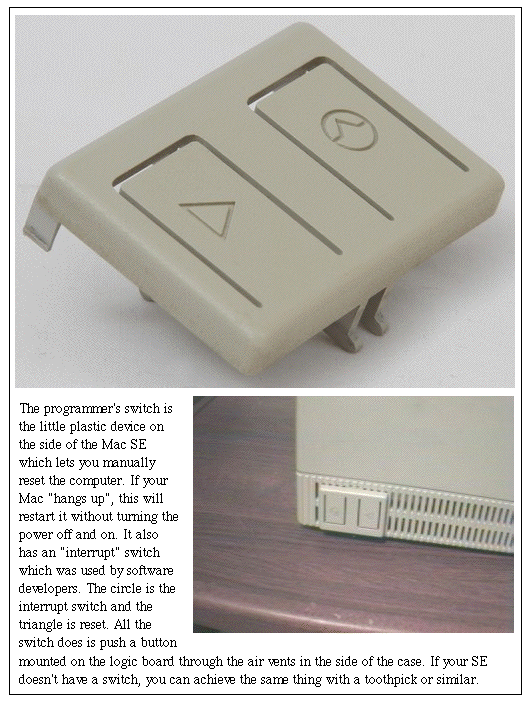 First thing to do is remove the programmer's switch if your SE has one installed. It's the oblong plastic thingy on the left side of the case at the bottom near the back. There are two icons on it, one of which is a left-pointing triangle like the one on the keyboard's reset key. It should prise out quite easily - pull at the bottom edge and gently wiggle it out.
The case is fixed at the rear with two screws near the base and two more tucked away in the carry-handle recess. You need a long 3/32" allen (hex) wrench, or a Torx T-15 driver, to undo them. The tricky bit is the length of the shaft needed to get to the screws in the handle. Mac suppliers used to sell 'Mac Cracker' kits for compact Macs that included a long T-15, and you might still be able to get one of these.
Alternatively, try to find a screwdriver/bit set that has both a long shank and an extension, or an extension and very long bits. Auto parts shops may have them. You can also buy the extension bits separately. You could even try putting a Torx bit into the plastic sleeve from a "Bic" pen.
You'll find 101 suggestions for getting a Torx driver or substitute here.
After you've removed all the screws, lay the SE screen-down on something soft before prying it open. The 'Mac Cracker' kits included a device which you slotted into the narrow indentation running round the sides and top of the SE, just behind the screen. Applying pressure levered the case away from the chassis slightly so you could lift it off.
A 1-inch spring clamp (available at many hardware stores) can also be used. Take the rubber protectors off the clamping jaws so you can get the jaws into the narrow groove of the Mac.
You can also improvise with a bulldog clip, metal ruler (take care not to damage the case) or similar. Some people recommend slapping the sides of the SE (not too hard!) to loosen it.
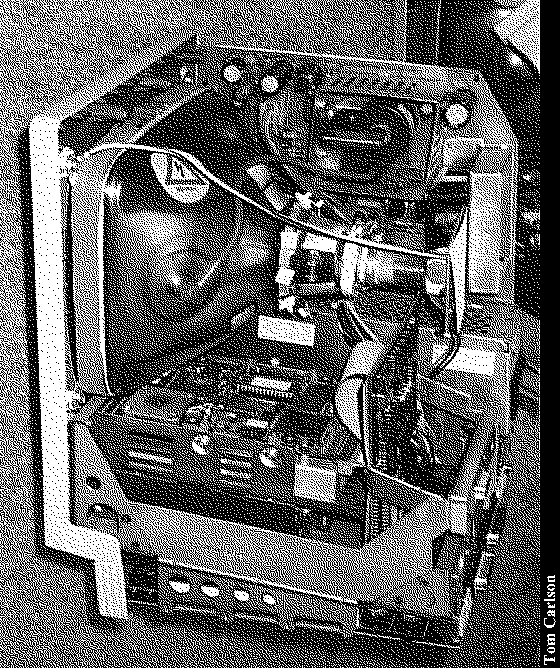
You can download a black-and-white GIF image of the inside of an SE here (about 50k). This machine has a video card installed vertically behind the hard disk, so yours may look slightly different.
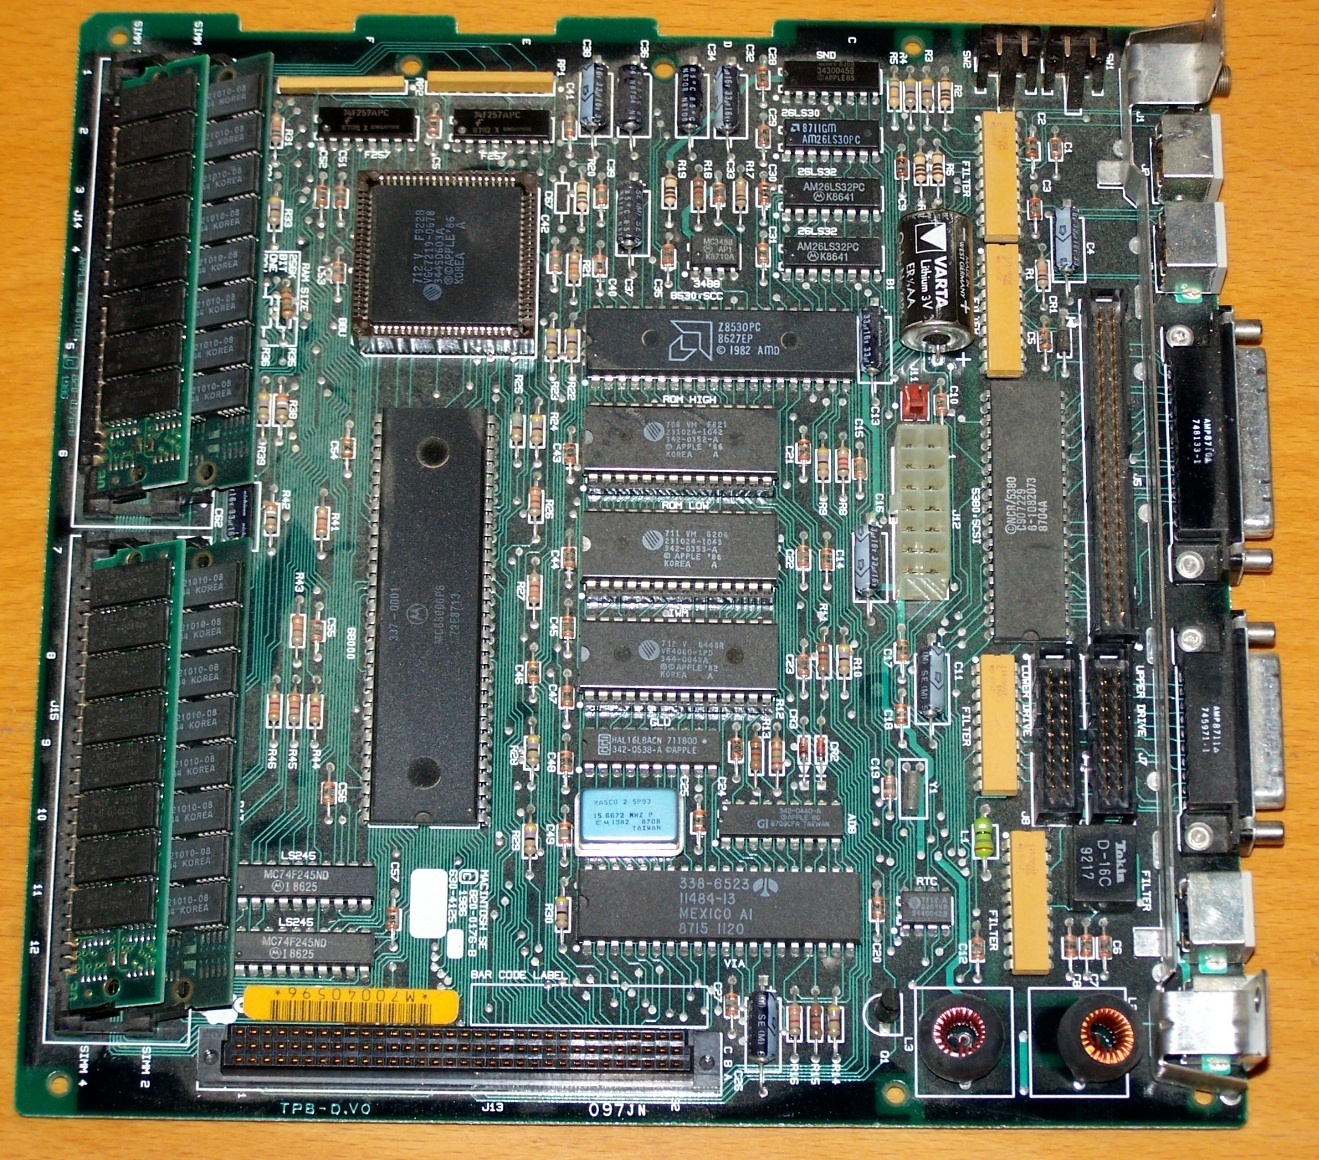
Here's a full-colour photo of the logic board (about 850k). Note the four SIMM slots in two rows at the far left, set at an angle. This edge of the board is at the front of the SE when it's installed. At the opposite edge are the rear ports for SCSI, keyboard, printer etc.
Many more hi-res photos of an SE's insides are available in Damian Ward's flickr set.
YouTube has videos of various people taking apart Mac SEs, some of whom know what they're doing. Get an up-to-date list here. That link will also find SE/30 videos, so select with care.
You can use one-megabyte or 256k SIMMs. Four megabytes is the most you can put in an SE (unless you have the kind of accelerator card which has its own SIMM sockets, allowing you to add more).
Once you've removed the SE case, take away the RF interference shield/foil covering of the motherboard and set it aside - it will just get in your way. Before yanking at the motherboard to get it out, disconnect from the board the power connector, the cable coming from the floppy drive(s) and the cable from the hard disk, if you've got one. Don't worry, they're hard to miss.
You'll find the power connector a pain. This has a plastic clip that must be depressed to release it - if you can get your darn finger in there.
Lift the motherboard slowly (it will require some pressure) until you see the slotted right edge of the motherboard line up with the metal chassis. Swing the motherboard out slowly. STOP! See that little wire still attached? That's the speaker wire. It's pretty impossible to reach at any other time so you have to disconnect it and reconnect it at this stage (it comes out easily). If you miss this and just yank the board out, there's a very good chance you will bend the connector pins and your SE will lose its audio for ever more.
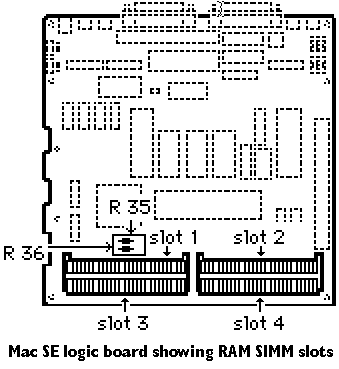
Gently place the board on a flat, dry, dirt-free surface. The four SIMM slots in two rows are at the front of the motherboard, set at an angle (see diagram here, a 6k black-and-white GIF image). Remove the old SIMMs by placing your thumbs at the sides of each slot and putting gentle pressure on the fragile clips. You'll feel the SIMM release and you can rotate it to a vertical position and pull it out.
Install new SIMMs the same way - press them vertically down into the slot, then push gently back into the socket until the clips snap them in. But first blow or brush out any dust or crud. It's important to ensure the SIMMS are properly seated, or you'll get problems when you try to start up the SE and have to open up the case all over again.
 There are four possible RAM configurations - 1mb, 2mb, 2.5mb or 4mb. You can't put a 1mb SIMM in the same row as a 256k one, and you can't have just one SIMM in a row. A 1mb SE has four 256k SIMMs. For 2mb, put two 1mb SIMMS in the top row (furthest away from the edge of the board), and for 2.5mb do that and put two 256k SIMMs in the bottom row. For 4mb, each slot has a 1mb SIMM. Note also that SIMMs in the same row must be of the same speed (150ns or faster).
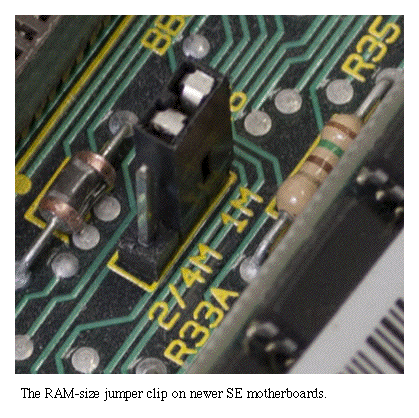
If you're taking your SE to 2.5MB of memory, the above method is correct for early-model motherboards with RAM-size resistors (see following paragraphs for how to recognise these). If you have the later design of motherboard with a jumper clip instead of resistors, you have to install the SIMMS the other way round - the 256k SIMMs go in the top row and the 1MB ones in the bottom row.
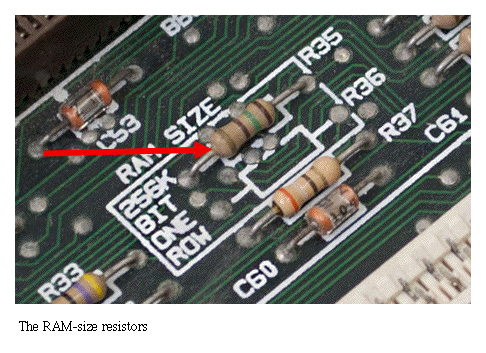
Now there's just one more thing to do before you close up the case. Older SEs have two locations next to the SIMM slots for resistors which tell the Mac what kind of RAM configuration it has. This spot on the motherboard is labelled 'RAM size'. The top resistor location says '256k bit / R35', and the bottom says 'One row / R36'.
On a 1mb SE the top location has a resistor soldered in place and the bottom one doesn't. With 2mb it's the other way round, the bottom location has a resistor and the top one doesn't. For 2.5mb and 4mb, neither location should have a resistor.
When you've changed the amount of RAM you'll have to ensure that these 'RAM size' resistors are set correctly, and for adding RAM this nearly always means removing a resistor. In fact, rather than cutting it out completely, it's better to snip the wire close to the board and bend it out of the way. Then, if you ever want to go back to a 2mb or 1mb configuration, you'll be able to resolder it.
If you ever need new resistors, they are both 150-ohm 5% carbon film resistors, colour-coded brown, green, black and gold.
Later model SEs have a jumper clip instead of resistors. It's labelled 'J16' and will have the words 'RAM size 2/4M 1M' printed on the board. Remove the jumper if you have 2.5mb or 4mb (but keep it in case you need it again one day). Put it to the left if you have 2mb, or to the right if you have 1mb.
 The Mac SE Support Pages, maintained by Chris Adams