This page was archived in 2023 as part of the Mac Hut archive and is no longer updated.Most of the site pages were last updated around 2008 and some information may be out of date. Become a patron: Support our efforts by contributing a small amount each month to cover our hosting costs and the time it takes to archive these pages properly. Thank you. |
Got here from the Web? Check out the Homepage!
James Garry has already written a treatise on rebuilding the PowerBook Duo batteries. His webpage is located here. Since his document is so complete already, I'll be concentrating on how the Type 1 batteries differ from the Type 2 batteries.
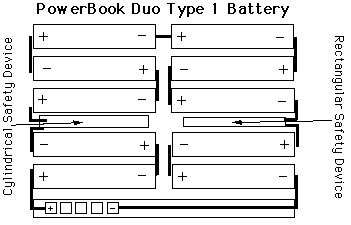
Type One batteries are much simpler internally--just the ten batteries and two thermal safety devices, all welded together with metal strips. The layout of the cells is different, too. Here's a diagram:
Use conductive epoxy to attach the cells together.
Soldering directly on batteries heats them up too much and you lose lots of runtime from thermal damage. Yes, even cells with solder tabs.
Get cells with flat ends.
Don't get cells with button ends. Cells with button ends are the normal AA batteries with the "bump" on the + end, like you get at the store. The "bump" is about 4mm tall, which is 8mm when you put two batteries end-to-end like in the Duo. The extra length means I had to cut both sides out of the battery! I had to cover the sides with tape! It's so ugly!
So, make sure to get cells with flat ends. You'll get bonus points for getting cells whose flat ends have solder tabs welded onto them already. While you probably don't want to actually solder there, epoxying onto the tabs will be easier than the raw end of the battery cell.
Conductive epoxy is very sensitive to being moved while it is curing.
I had to redo about 4 joints becuase they were moved a little bit once the 5-minutes working time was up. Tape those cells together for security.
Don't try to join the whole pack in one go.
Mix up two small batches and do half the pack in one sitting, then the other half. That'll increase the quality of your joints because you'll have fresh epoxy all the way through. The last couple joints I did were the ones that broke, because I used one mix for the whole thing, and it was already getting stale.
Don't accidentally create a short circuit. Ever.
While I was gluing one of the last joints in the pack, I pushed a couple of cells too close to each other without realizing it. I didn't know anything was wrong until a few seconds later, when the magic smoke escaped from my new high-capacity cells. :-(
The front slidey-bit on a Type 1 battery is only held on by a plastic bump, so gently applying increasing pressure in the direction of normal "off" motion will cause it to come off.
Gently open the Duo battery. I did this by cutting through the seam on one of the sides, very gently, with an abrasive cutoff wheel in a Dremel. Once one side was opened, I pried with a screwdriver and broke the glue holding the other three sides together.
When cutting the battery open, DO CUT on one of the short sides. Behind the area where you're cutting lies steel welded conductive strips that you're going to throw out anyway, so you don't have to be particularly careful.
DON'T CUT the front long side (with the touch-connectors). Damaging wiring just behind that seam would require an annoying repair. Pry the long sides open, don't cut them.
Once the battery case is cut open, just gently cut the welded strips connecting the touchpads to the batteries, and between the batteries and the safety devices. Using a cutoff wheel with a Dremel makes this very easy gives clean cuts. Discard the old batteries, but don't forget to write down where everything connects first!
Tin the cut-ends of the steel strips on the safety devices and the touchpad connectors. Solder small hanks of wire onto these. Cut several more small hanks of wire.
Use conductive epoxy to attach the batteries together in the proper fashion using those small hanks of wire you cut and stripped. Again using epoxy, attach the safety devices in their proper places and attach the power connector. Check all your connections with a DVM.
Reassemble the pack, squishing the little wire-bits out of the way. Make sure there aren't any bulges or other bad things. If you were smart and used flat-ended AA NiMH cells with solder tabs, this will probably be really easy. Slip the battery into your Duo and you're set!
If you're like me and used cheapie NiMH cells with buttons on the end, you'll find that they're too long to get the battery closed again. Use that Dremel you love so much to hack up the case until it'll fit. As long as you can get the beast inside the Duo and it makes electrical contact, you'll be fine--just don't change batteries very often. :-)
If you only use one battery in each Duo, you can get away without re-gluing the battery case halves, but if you're going to remove the repacked battery very often, using little dots of Super Glue to fix it together is a good idea.
Text and images copyright 2005 Tyler Sable.
Information is presented for research and enterntainment only
.
Any actions taken are the sole responsibility of the reader.
NO WARRANTY is expressed or implied.