
Just about any SCSI hard disk will do, Apple or non-Apple, even ones that have been hooked up to PCs. Unlike PC users, you don't need a controller card to run a SCSI disk - that capability is built into every Mac. Look for a 'SCSI 1' drive; SCSI 2 is a later standard your SE can't take advantage of, though such a drive may be backwardly-compatible.
Photos of various kinds of hard drive to help with identification can be found here.
Extra storage is of course very useful, but an important hidden benefit is that the more modern drives are faster, and if you use one as your System disk, your SE will get a very noticeable speed bump - it's like having an accelerator. The operating system needs to access the System disk frequently, and the faster that disk is, the zippier your SE will be. The first thing you'll notice is that your machine boots up much quicker.
![]()
![]() There's room inside an SE for two floppy disk drives, or one floppy and one hard disk. Some people have managed to squeeze two floppies and a hard disk in there, but you need a special mounting frame, and to guard against interference between the drive and monitor tube electronics. If your SE has two floppies you can either remove one and replace it with an internal hard disk, or add an external HD.
There's room inside an SE for two floppy disk drives, or one floppy and one hard disk. Some people have managed to squeeze two floppies and a hard disk in there, but you need a special mounting frame, and to guard against interference between the drive and monitor tube electronics. If your SE has two floppies you can either remove one and replace it with an internal hard disk, or add an external HD.
If you already have an internal HD, you can replace it or fit a new one externally. Going the latter route saves having to pry apart your machine and fiddle about with the innards, plus you get to have two hard drives instead of one. (Tip: If you keep a backup of your System Folder on the old internal disk, if anything ever happens to the new external one your SE will boot from the backup). And if you get a new Mac, you can transfer your external to that. However, external drives with their case and built-in power supply cost a bit more, take up desk space, and create more cable clutter.
Internal drives, sometimes called 'bare' drives, don't need a case and take their power from the SE. For fitting instructions and diagrams, go here. Watch, though, that the drive doesn't overload the SE's power supply. Drives that spin at 4,500 revs per minute should be OK, and experience suggests that 5,400 rpm drives up to 540MB capacity will be too. You needn't worry about any of this if you're just plugging a drive into the external SCSI port.
You can buy an empty case with the necessary connectors, cabling and power supply, put a bare drive into it and use it as an external. If you have an unused drive lying around, this might worth thinking about. My external drive is housed in an old SyQuest removable drive case. The SyQuest died, but I kept the case, and its connectors and power supply match the HD.
Bare drives are trickier. The number may be set with dip switches or jumper clips on the PCB. Trouble is, there could be more than one set of jumpers, so how do you know which set is the right one? And how should it be configured? Try asking the supplier of the drive, but if they don't know, you'll have to do some detective work.
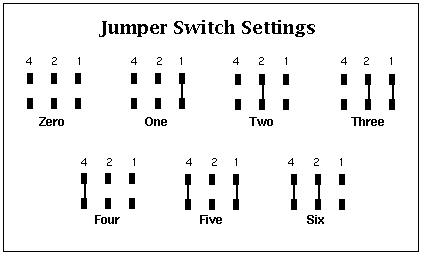
Bare drives often have an ID of zero, so if that's want you want you could just try it and see. If it doesn't work, you'll have to dig deeper. Typically what you're looking for is a set of three jumper pins (maybe marked A0, A1, and A2) or dip switches, probably using a binary notation to select a number between zero and six. This isn't as complicated as it might sound when you get the hang of it. Here's a table showing all possible combinations of jumper settings:
 The small black rectangles represent the vertically-aligned pairs of pins, three pairs to a set. The vertical lines represent a jumper clip connecting one pin with its partner. There are seven sets of pins here, to show all seven possible combinations, but you'll only be dealing with one. The first set has no jumper, which gives a SCSI ID of zero. The second has a jumper on the right pair, giving an ID of one. Skipping to the fourth set, there are now two jumpers, on the middle and right pins - this gives an ID of three. You can see how it works - the left pin has a value of four, the middle, two, and the right, one. Total up the values of connected pins and you have the SCSI ID setting.
Note that in this example the values run four, two, one from left to right. But when you're looking at the pins on your drive they could be 'upside-down' (how would you know?). So then it would be four, two, one from right to left. Confused? The only answer is to experiment.
A useful ploy: if there are no jumper clips the ID has to be zero, and if there's one in the middle it has to be two. This is true whether you're working 'upside-down' or not. And no, you can't use three clips to give an ID of seven - that number is reserved for the computer's SCSI controller.
The jumper clips themselves are tiny plastic blocks with conductive metal strips inside. They slide on to a pair of pins, connecting them. You can buy them at component stores, but make sure they're the right size to fit snugly.
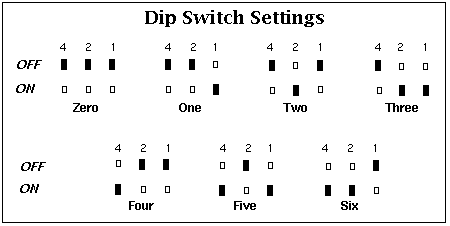
 Here is the same diagram adapted for dip switches. A dip switch is either 'off' or 'on', and the small black rectangles show the position of the switches for each SCSI ID setting, from zero to six. Again, you might have to experiment to find out whether the switch values run four, two, one from left to right, as here, or from right to left. In addition, you'll need to know whether a switch is 'up for off, down for on', or vice versa!
The hard drive manufacturers Quantum and Maxtor have been taken over by Seagate. The support site with technical info you may need is at Seagate Support. Select internal or external drives, and scroll down for "Legacy Drives".
For an A to Z list of drives with very detailed information about jumper settings and much more, go to the excellent stason.org. Or you could try Discount Computer Peripherals, who also stock obsolete and hard-to-find drives.
There's a limit to the total length of SCSI cabling that will work reliably. If you're just adding one or two devices, this won't be an issue, but in general the shorter the chain is, the better. On the other hand, short cables give you less flexibility when positioning drives on the worktop.
Cable quality varies a lot. Thin, cheap cables have minimal insulation guarding against signal interference. Experienced users with the usual spaghetti of wires dangling from the backs of their computers won't touch them with a barge pole. Well-insulated cables are so thick they're difficult to bend round corners, and more expensive. If you can route your cable well away from anything that might interfere with the signal, you might get away with a cheap one....
You'll also need a SCSI 'terminator' for an external drive. This is a small device that looks a bit like the connector on the end of a SCSI cable, but without the cable. Your drive will have two sockets, one for the cable coming from the SE or previous device in the chain, and one for the cable running to the next device. If there is no next device, because it's the last or only one in the chain, the unused socket must have a terminator. This 'soaks up' any signals that reach it and prevents them being bounced back down the chain, causing data corruption. You can get a terminator from computer stores.
If you are adding more than one external SCSI device to an SE without an internal hard disk, you will need two terminators. One goes at the end of the chain, as before. The other must be plugged into the first device, and the system cable from the SE plugged into the terminator (terminators commonly have a male connector on one side and a female on the other).
Hard disks, both cased and bare, might have termination resistors built into the PCB. That's fine if the drive is at the end of the chain - you won't need a normal terminator - but you'll have to pull the resistors out if it isn't. The drive's supplier may be able to help you with this, or ask a knowledgeable friend.
Note that some drives have termination turned on or off according to the position of jumper clips or perhaps dip switches. Try to avoid these if you don't know how to change the setting.
If you're putting a bare drive inside an SE, again you'll need to be aware of whether or not it is terminated. Internal drives do need to be terminated.
Apple-brand drives can be formatted with the 'Apple HD SC Setup' program that comes with System software. This application is not intended to format non-Apple drives and won't normally do so. But it can be 'patched' (i.e. have its code altered) so that it will handle some (all?) makes of drive.
A program has been written to patch Apple HD SC 7.3.5. It and further information can be found at: http://www.euronet.nl/users/ernstoud/patch.html, along with a link to download Apple HD SC 7.3.5, and simple instructions on doing the patch yourself using ResEdit.
An old but still useable disk formatter is Lido 7 from Surf City Software. It's free, and can be downloaded from the Net. Lido dates from the mid-1990s, but should work fine with older machines and most older drives. Read details here. And this web page has lots of information on Mac SCSI hard disks and formatting utilities.
Use these old and patched formatting utilities with care. Even if they seem to work, test your drives thoroughly before relying on them.
Note that new drives are often sold with formatting software included. If you're buying a second-hand drive that's been hooked up to a Mac, try asking the seller for the software that came with it. If all else fails, you may have to buy the software. A package called Silverlining or FWB's Hard Disk Toolkit are the two most often recommended on the Net.
One question your formatting software might ask you is what "interleave" you want the disk formatted at. For an SE the answer is 2:1 (for a Plus it's 3:1) if the drive does not have an internal data cache, but 1:1 if it does. Other settings will also work, but slow down the data transfer speed. Nearly all HDs since 1988 do have a cache.
With Apple HD SC Setup 7.5.3 (and maybe other versions?) pressing Command-I gets you a dialog box for setting the interleave factor before reformatting. It shows the best setting for your Mac model and drive.
If you are comfortable playing around with drive settings and are having problems with one not used with a Mac before, try making sure the following settings are correct, if available: Parity off, Synchronous negotiation off, Wait spin off, Unit Attention disabled, Spindle sync disabled, Terminator power supplied by the drive to the SCSI bus.
HD SC Setup was long ago replaced by a new Apple formatting utility, 'Drive Setup', now included with System software. Don't use this on a drive you're going to hook up to an SE - stick to the old HD SC Setup.
'Removable' drives use disk cartridges - when you've filled one up, remove it and put in another. They're ideal for making backups, or can even be used as start-up disks. (My SyQuest 44 megabyte removable is a very old format now, but it's still a lot faster than the 20 meg hard disk inside my SE). Like external HDs, you can take a removable to your next Mac when you upgrade.
As with the sub-200 megabyte hard disks, second-hand prices for old SyQuests, Bernoullis etc. are now very low. You need to be sure you can still get hold of the cartridges they use, at a reasonable price. Don't go for a cheap drive which forces you to buy costly cartridges for ever after. If you divide the cartridge cost by its capacity in megabytes you'll get a cost-per-megabyte figure that lets you compare different formats.
As with fixed hard disks, you'll need formatting software, a SCSI cable, and a terminator if the drive is at the end of the SCSI chain. I've used the patched version of Apple HD SC Setup, mentioned above, to format a SyQuest 44 meg cartridge, so it doesn't just work with fixed hard disks. However, I needed to use a shareware 'disk mounter' program like 'SCSI Probe' to see the disk on the desktop if it wasn't in the drive at start-up. Setting the SCSI ID should be easy - like external fixed disks, removables ought to have a selector button/switch at the back of the case.
However, you might be better off forgetting the old stuff for once and going for one of the Zip drives from Iomega - there's a 100MB drive and a 250MB. Zip drives are portable and lots of people have them - if you need to swap large amounts of data with others, it may be the one to choose.
Note, though, that some versions of the Zip software are said not to work on SEs. Version 4.3 will work, I'm told, though you might have trouble finding it. Here's version 4.2 (946k), which also works. One user wrote to say that Zip Tools 5.0.1 was fine with his SE and System 7.
comp.sys.mac.wanted
misc.forsale.computers.mac-specific.misc
comp.sys.mac.hardware.storage
uk.adverts.computer
 The Mac SE Support Pages, maintained by Chris Adams