
Chapter 1
| About the Macintosh Chapter 1 |
What I had to assume
I couldn't produce a guide for every single version of the System running on every single model of Mac. Much of the advice and information in this document applies throughout the Mac range, and although it concentrates on System 7.5, a lot of this information is general. And who knows, if you don't already have System 7.5, you may be persuaded to upgrade!
What I had to leave out
This isn't a document for serious, heavyweight Mac professionals (although even they might learn a trick or two). It's for ordinary home or office users who want to understand and use their machine that much better. For that reason I've steered clear of networking - it's a complicated subject that's only going to be relevant to a small number of people. I've also had to leave out advice on hardware and software, just because there wasn't space to include it.
What I've crammed in
For all the things I had to leave out, I like to think I've stuffed a lot more in! In this document it's tough to explain the Macintosh from the ground up, catering for both complete beginners and experienced Mac owners - but I think I've made a pretty good effort!
I hope you like it.
This section is for people who have never used a Macintosh before. It starts with what you see when you first switch on your machine, and by the end you should be able to find your way around. If you've used a Mac before, you don't need this section.
If you've never used a computer at all, your Macintosh will give you the simplest, most painless introduction to computing possible. If you've used another machine, your Mac will make you wonder why all manufacturers don't make computers this easy to get to grips with.
What's an Operating System?
To start with the very basics, your Macintosh has both a body and a brain. The body is the hardware on your desk - the main box, the monitor, the keyboard and the mouse. None of this is of any use, though, without the Mac's brain. This is the software that works with the hardware to display documents on the screen, moves the pointer when you move the mouse, stores your programs and files so that you can find them again and a hundred more invisible tasks that you wouldn't usually be aware of. This brain is, to use the proper computing jargon, the Operating System - it controls how your Macintosh thinks.
All computers have their own operating system, and this is what differentiates one machine from another. Macintoshes have their own operating system, PCs have theirs (the new Windows 95 is very much like the Mac's operating system) and other computers like the Commodore Amiga and Atari ST have different operating systems too. These days, though, the PC and the Macintosh are the two main computer types to choose from.
Why don't all computers have the same operating system? The reasons are historical and commercial. At different times, different computer manufacturers have looked at the opposition and decided they could build something better - something that's easier to use, nicer-looking or more efficient. That's all very well, because it ensures that computers evolve in a spirit of competition. However, there are two drawbacks:
| 1. | Macintoshes are different to use to PCs (and other types of computer). You have to learn how to use each machine differently - they display information differently, and they are controlled differently.
|
| 2. | Programs designed to run on a Macintosh won't work on a PC, and vice versa. |
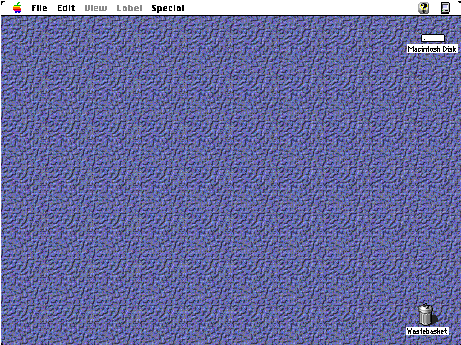
The part of the System you actually see is the Macintosh's Finder. The Finder is a program that helps you find and organise your files and programs, and it's always running. The Finder is what you see when you first start up your Macintosh, and you can always switch back to the Finder while you're working with another program. The Finder is basically your Mac's control centre, and this is what it looks like (the details may vary from one Macintosh to another, but the main components are the same):
Using your mouse
But before you start experimenting with the Desktop, there are some techniques you need to learn. Most of the things you do on your Macintosh are controlled with the mouse. As you move the mouse around on a flat surface, you'll see a small pointer moving about on the screen: 
You make things happen by moving this pointer to the right place and then using the button on top of the mouse. Now, there are three ways of using this button:
| 1. | Single-clicking. Where you are asked to 'click' on something, move the mouse pointer to the right place and press once on the button.
|
| 2. | Double clicking.The same as single-clicking, except that you have to press the button twice in rapid succession. (This can be hard for beginners initially, but it comes with practice.)
|
| 3. | Dragging. Here you have to position the mouse pointer, then press the mouse button - and keep it pressed while you move the mouse pointer. This technique is used when you use 'menus' on the menu bar' (see below) and when moving icons from one place to another (e.g. dragging an unwanted file to the Wastebasket). |

Along the top of the Desktop is the 'menu bar'. Menus are lists of commands you can give that become visible when you move the mouse pointer over them and hold the mouse button down.
To select one of the commands (the proper term is 'options') you just move the mouse pointer until that option is highlighted underneath it, and let go.

For example, the Erase Disk... option (above) deletes all the information stored on a floppy disk inserted in the disk drive (obviously, it only works if there's one inserted). Some of the options on the Desktop menus won't make sense right now, but that doesn't matter for the time being.
Most programs you run on your Macintosh have a menu bar (although some, such as multimedia products and games don't - or don't always display it), and it's always displayed right at the top of the screen. All menus work in the same way, too - you position the mouse pointer, dick on the menu name and, still holding the mouse button down, move the mouse pointer down to the option you want, so that it turns black (it's 'highlighted') and then let go.
You'll notice that there are half a dozen named menus in the Desktop's menu bar, together with an array of symbols. You can dick on these symbols to do a variety of things. You will probably see just three on your Desktop:
 | The 'Apple menu' (far left). This is a special menu which you can set up yourself to offer short-cuts to your most-used files or programs, amongst other things. It also offers quick access to the settings that control the way your Mac works and lets you access the small programs, like the Calculator and the Puzzle, that come with your Macintosh.
|
 | The 'Help' menu (towards the far right). Most programs come I- with 'on-line help' so that you can call up screens containing advice, definitions and instructions while you're working.
|
 | The Applications menu (far right). Your Macintosh can work on many things at once. We mentioned earlier that the Finder is always running, and you can go back to it at any time - by selecting it from this menu. When you're working with a program, this icon changes to one that represents the program, but it still works the same way - any time you want to get back to the Finder (your Desktop) or another program, simply choose it from the list that appears when you click on this icon.
|
 | The menu bar in the main illustration above contains a couple of additional icons. Don't worry about these. Some programs create menu bar icons like these so that you can access the programs quickly at any time - another valuable short-cut for more experienced Mac users. |

For a start, not all of the menu options you see are in black text - some are grey. When an option is grey (or greyed out, to use the proper term), you can't select it This is because not all menu options are necessarily appropriate or possible at any one time. For example, if you try to empty the wastebasket (described later) when there is nothing it, you'll see that option is greyed out. In this same menu (above) you'll see that the Eject Disk option is greyed out - that's because there isn't a disk currently inserted.
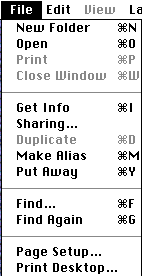
On the File menu (above) you'll notice that (as well as options that are greyed out), many of the options are accompanied by symbols. For example, the New Folder option has a small symbol followed by a capital 'N'. This symbol is the one you find on your keyboard's command key (which often has an apple on it too). The command key offers short-cuts to many options you find on menus, and in this case, holding down the command key and pressing the 'N' key will have the same effect as choosing the New Folder option using the mouse. Many of the options on the File menu have these keyboard shortcuts, and they can save more experienced Macintosh users a lot of time. Because they're always visible when you use the menus, you quickly get to learn them without having to try - soon you'll find you stop using the menus for many tasks and rely on these shortcuts.
Still on the File menu, you'll see that a couple of the options are followed by three dots (...). These are continuation marks, and they are a kind of visual shorthand to let you know that these options lead to dialogs. We'll be looking at dialogs shortly, but basically they are devices that ask you for any extra information the Macintosh needs before it can carry out the command you've selected.

Lastly, take a look at the Apple menu. If you have System 7.5 installed on your machine, you'll see some options with right-facing arrowheads. This means that if you choose these options, a smaller sub-menu will pop up alongside, giving you a further range of options to choose from. To select one, just move the mouse pointer over to this sub-list, without releasing the button.
Shutting down
This is the first menu option you need to memorise! Take a look at the illustration of the Special menu below, and the last option - Shut Down. When you want to switch your Macintosh off, ALWAYS choose this menu option first so that it can close down its disk drives properly and check for any unsaved data.
Talk to me!
Many of the options you select from menus will need you to supply further information. For example, if you want to open a word processing document that you've been working on previously, your Mac is going to need to know what it's called and where to find it Your Mac gets this additional information in the form of a dialog (the American spelling is obligatory, I'm afraid). A dialog is like a form, where you have to fill in the right information in the right places. Here's the dialog that the ClarisWorks program displays when you try to open a file.

It may look complicated, but it breaks down into pretty easy-to-understand segments. The main part of this dialog is a mini-window which lets you choose which file to open. (It also displays folders which you can double-click on to see if the file you want is within them.) You'll see this mini-window often when you're handling files, and there are other items in this dialog you'll see repeatedly too:
At the bottom of the dialog are two options - Document Type and File Type - which are peculiar to ClarisWorks, and you don't need to know about right now. However, the downward-pointing arrows after All Types and All Available indicated that there are choices to make.

When you see a box like this, with a downward-pointing arrow, it indicates a 'pop-up' menu. If you click on this box and hold the mouse button down, a menu appears which contains a pre-set range of choices for you to make a selection from. Pop-up menus can help you decide where to save a file, choose the type of file you want to create and more. Meanwhile, on the right hand side of the dialog you'll see a column of 'buttons' (Buttons are objects you click on once to make something happen.) The top one (Eject) is greyed out, meaning that we don't have a disk inserted. The next (Desktop) is a shortcut back to the top level of your filing system, which is useful if you get lost The third button (Cancel) stops the whole operation and the dialog disappears. There's a Cancel button on just about every dialog you'll meet, you'll be pleased to here. Finally, there's the OK button. You click on this when you're satisfied you've chosen all the other options correctly.
You'll notice that the OK button has a heavier border. This is a useful short-cut in dialogs. Pressing the Return key is the same as clicking on whichever button in a dialog has the heavy border (there will only ever be one). Quite often you'll open dialogs that you don't need to make any changes to, and pressing the Return key is quicker than moving the mouse pointer and clicking.

Nearly all dialogs will have at least an OK (or Open, or Save) or a Cancel button and many dialogs will have additional buttons.
There are three other types of object you'll meet in dialogs which aren't illustrated in my ClarisWorks example (above):

This box is called a 'field'. Fields are used where you, the user, need to enter a name for a new file, for example. Dialogs often fill in these fields with standard text which you can change. When the text, as in this case, is highlighted, you can start typing straight away and what you type will replace the highlighted text.

Above is a 'checkbox', shown in 'unchecked' and 'checked' state. It's like ticking a box on a form to say if you want something or not. To check or uncheck a checkbox, simply click on it.

Above are 'radio buttons'. You find them in groups of two or more, and they let you choose one out of a related set of options. They are used where one response has to be chosen out of several possibles - rather like multiple-choice questions.
The Desktop
The hard disk is where everything on your Macintosh is stored - your programs, your files, and all the files your Mac needs to run (I'll talk about programs and files shortly). You will often see desktops with many more icons, but these all represent items stored on this hard disk. Think of your hard disk as a 'box'. You can take things out of this box and leave them on your Desktop if you like, just to make them easier to get at However, this is an illusion - they are still stored on the hard drive.
Getting back to the Desktop
And because it's so central to everything you do on your Macintosh, it's helpful to be able to get back to it when you need to. I mentioned earlier that your Mac could run several programs at once, and each program you run will take over the screen. It will put its own menus in the menu bar, and almost certainly cover up much of your Desktop. This can be confusing if you don't know what's going on. Think of your screen in terms of layers. At the bottom layer is your Desktop, while on top of it you can have one or more programs running, in the same way that you might have one or more books open on a proper Desktop, one on top of the other.
This is where the applications menu (mentioned earlier) is so useful. Unlike most of the menus, it's always there, and you can use it to switch quickly between applications (which is what Mac people call programs). When you choose a program from the menu, it brings that program to the front of the heap.
If you want to get back to your Desktop, simply choose Finder from the applications menu. However, the display will probably still be cluttered partially by other applications you have running. So, from the same menu, now choose Hide Others - your Desktop is now clearly visible.
Looking through windows
This will show you what's stored on your hard disk (what you see will be different to this, but the same principles apply). Depending on how your hard disk is organised, you will probably see a whole bunch of folders.
Note that the window I've created has a title, which is the same as the icon we double-clicked on. Double-clicking on the icon was pretty much like saying 'let me see what's inside this'.
Folders, as you may have guessed, are only containers for other things. To return to my earlier analogy of your hard disk being a box, folders are boxes within boxes. You use them to keep related documents together and in a certain place. Using folders you can create a complicated but efficient filing system. As usual with filing systems, though, you may well be the only one who understands it...
There will be more on folders and how you can organise your Macintosh in further sections, but for now, let's return to windows. All Macintosh windows have the same basic structure. They are rectangular boxes that you can move about on the screen. You can also make them wider or shorter, and it's easy to arrange several windows on the screen so that they don't overlap each other.
To move a window (like the one I've created when I double-clicked on the hard disk icon), move the pointer to the title bar:
and, using the dragging technique described earlier (holding down the mouse button while moving the mouse pointer), drag the window to a new location (a flashing outline indicates the new position of the window while you're dragging it). Then let go of the mouse button, and your window is placed in its new position.
The problem with windows, though, is that they are a finite size - regardless of the number of items they contain. So how do you make sure you can see everything? Well, there are a few approaches:
All windows on the Macintosh share these features, and you handle them all the same way. If you use a word processing application, for example, your text document will appear in a window that you can resize, move and scroll around.
Although you can have more than one window open at once, only one of them is active at any one time. You can easily tell an active window from an inactive one by its appearance.
Compare the picture above of the Hard Disk window with the one earlier. In this version, the title bar is plain white and all the gadgets used for manipulating windows - the scroll bars, the close box and resize box - have vanished. This is because this window is no longer active - there's another window on the screen which is active.
To make a window active, simply click on it once. The scroll bars reappear and you can now carry out the action you want. As you get more experienced, you'll find yourself regularly working with several windows open at the same time.
Launching an application
Once your application is running, what you need to do next depends on the application, and you should refer to its manual. Nevertheless, all the things I've looked at in this section - windows, icons, menus and dialogs - will work in the same way.
Applications and documents
You have to get organised when saving files, otherwise you'll never be able to find and open them again. When you're working on a document, you'll find the Save option on the File menu. It's a good idea to save your document now and again even if you're still working on it. When you choose the Save option, it updates the file on your hard disk with all the changes you've made since the last Save. And since Macintoshes occasionally crash, hang, or freeze (in other words, they lock up solid and won't work until you switch them off and restart them - thereby losing the contents of the memory), regular Saving will mean you're less likely to lose work as a result.
As well as a Save option, your file menu will also have a Save As ... option. This is so that you can save your file with a different name. If you're experimenting with changes to a letter, for example, and don't want to lose the original, choose Save As... and then pick another name. This will leave you with two files on your hard disk - the original, and your experimental version.
Basically, though, there is one message that applies all the time you're working on your Mac. SAVE, SAVE, SAVE. ..! After a while, it becomes a conditioned reflex to hit the command-S keyboard combination (universal shorthand for Saving the file you're working on) in idle moments.
Expert tips
Some multimedia titles and games don't display their menu bars while they're running a sequence or in certain modes. If you need the menu commands, try tapping the spacebar, clicking the mouse button or hitting the ESC key.
Having got the menu bar out of the way, we can turn our attention to the rest of the screen. This is the Desktop, and in my example it's pretty bare. There's simply an icon in the top right called Hard Disk (it may be called something different on your machine) and on in the bottom right called Wastebasket.
The Hard Disk icon on your machine will not look exactly like this one (that's one of the beauties of the Mac - you can change the names and the appearance of icons to suit your own taste), but your Desktop will have an icon that represents your machine's internal hard disk.

The Wastebasket is where you put all the things you don't want any more. In older versions of the System, this wastebasket would be emptied periodically, but now you have to tell the Mac when you want it emptied (choose the Empty Wastebasket option on the Special menu). This provides a bit more security - it's all too easy to throw things away accidentally. You can tell when your Wastebasket has something in it because it visibly bulges!
Those, then, are the components of your Mac's Desktop. It's the place where you organise your files and information, and it's the starting point for all your activities.
Most of the things that happen on the Macintosh happen in Windows. You can see an example of a window if you move the mouse pointer and double-click on your hard disk icon:

Folder icons look like this. Sometimes programmers change these icons to add a bit of style to their software, and Apple itself uses modified folder icons to indicate important folders (like the System Folder and Applications folder in the illustration above). Largely, though, they all share the same design.


Do you see the little symbol at the bottom right-hand side of the window? This is the resizing box. If you drag on this, you alter the position of that corner of the window, which means changing the window's size and proportions. Again, the outline of the window is shown as a dotted line until you let go of the mouse button. You can use the resizing box to make the window bigger or to fit it in with other windows open on the screen at the same time. But there may be so many things in the window that you still can't see them all even if you increase the size of the window. How would you know? Look to see if the window's scroll bars are grey or white:

This is a scroll bar. You'll see one along the bottom of a window and down the right hand side. If the scroll bar is grey (like this one), it means that the window isn't big enough to show you everything it contains - you can use the scroll bar to move the view of the window's contents. Imagine looking into a large room through a small window, and having to keep changing your position to see into the corners of the room. You can use the scroll bar either by clicking (or pressing) on the arrows at either end, or by dragging on the scroll box (seen here at the left-hand end of the scroll bar). It's important to get used to scroll bars, because you'll be seeing them a lot.

There's an icon in the top right-hand corner of every window. If you've changed the size or position of a window, clicking once on this will restore it to the old one. Click again to go back to the new one. If you haven't re-sized the window, clicking on this will increase the size of the window just enough to display everything inside it (if your screen is big enough).

Finally, look out for this icon in the top left-hand corner. This is the close box, and you click on this to close the window.

That's another way of saying running a program. The Mac has a language all its own, and you do need to get used to it, if Mac magazines and software manuals are going to make much sense. Anyway, I've looked at the Desktop, windows, menus, icons and dialogs, which is pretty well all there is to know about the Mac's operating system (or Finder, which is the visible part). The point of having a computer, though, is to use applications - word processors, drawing packages, business accounting programs and more. Launching Macintosh applications is easy. There are two ways:
1. 
Every program on your Macintosh has an icon. This is the icon for ClarisWorks, a package that's pre-installed on most new Macintoshes now. To launch ClarisWorks, simply find the icon on your hard disk and double-click on it. 2. 
There is an even easier way. Every document you create with a Macintosh program has a special signature that identifies it as being generated by that program. Documents usually have an icon like the application's icon, too. Not only are ClarisWorks documents, for example, easily identified, you can double-click on them to open them up. This is one of the cleverest aspects of the Macintosh - you don't need to know where applications are stored, because if you double-click on one of the application's icons, it will open up with the right application automatically - it will find the application for you!
Application is the proper Mac-speak for computer program. An application could be a word processor, a drawing program or an accounts package. You use the application to create documents which you can save and load up again another time. When you first switch on your Macintosh and launch your application (Mac-speak for running your program), it loads from the hard disk into your Mac's memory before it starts working. And when you create a new document with that application, it stays in the memory until you save it. Don't forget to save your documents! Because when you switch off your computer, the memory is wiped clean. The same applies to any changes you make to existing documents already stored on your hard disk - if you forget to save the changes before you shut down, you will, in theory, lose them forever. However, if you shut down your Mac properly, you get warned if you have any unsaved data, and it is hard to accidentally wipe it.
If you drag an item to the Wastebasket and then change your mind about deleting it, double-click on the Wastebasket to open it, select the item and then hit command-Y This puts the item back where it was before.
Please send any comments on this document to:
 G.Mills@compserv.gla.ac.uk
(George W. Mills, Computing Service, University of Glasgow)