This page was archived in 2023 as part of the Mac Hut archive and is no longer updated.
Most of the site pages were last updated around 2003-2004, as such various information may be out of date. The forum and equipment for sale sections have not been archived.
|

FrankenMacs
This page has all the info I collected on hacking up your 6400 :)
Return to The 6400 Zone Home page
If you have any hacks that might interest others then please send me the info. Images of the hack are a big plus :)
Fabricate a CD Bezel for the Top Bay
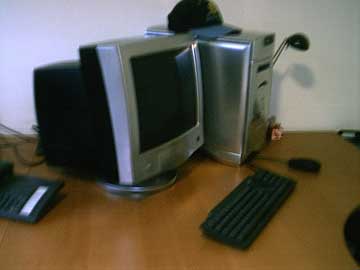
4 IDE drives in a 6400! 10/20/2000
This time a 6400 owner took his Mac too far! Rodney was able to install 4 more IDE drives by removing the internal subwoofer speaker box and connecting them with Sonnets Tempo IDE PCI card. When will this madness end :) Thanks for the info Rodney. I asked him for pictures or instructions on how to do this so all of you can to.
- [Tom,
Just wanted to pass along to you that I have now equipped my Performa 6400 with 4 internal Maxtor IDE drives. The 6400 has enough power to supply them juice and still not overheat. The temp ranges between 34 degrees (first starting up early in the morning) to at the most 59 degrees Celsius (after running all day long and having the room the 6400 is in be fairly warm). The Tempo card is great. I've gone from having a 6400 that 4 years ago had only a 2.4GB IDE drive in it, to now I have a 45GB, 40GB, 30GB and 10GB internally installed for a total of 125GBs of internal disk storage. In addition, I still have 7 external SCSI devices at my disposal. So, I can still use my external SCSI UMAX scanner, my external 9GB SCSI LaCie drive, external SCSI LaCie CD-R writer, Nomai 540MB external SCSI removable cartridge drive.
Anyway, I've rambled enough. Just let people know that there is room for 4 internal IDE drives in our 6400s. :-) You just need to remove the subwoofer and buy two power Y-adapters to split the power to the extra two drives.]
I should have picture by next update. Also he noted to be careful of the IDE cable placement as they are long and can get in the way of the power supplies fan. This is not a good thing!
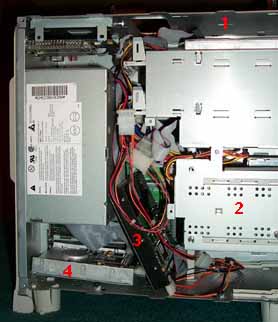
11/1/2000 Update: Rodney sent me some pics and I added one of them below. I have numbered the IDE drive locations he used 1-4. (sorry for degrading the image. My web space size forces me to reduce images a lot!)
- 1 and 2 are stock HD locations with 1 being normally a SCSI location.
- 3 and 4 are where the subwoofer box used to sit. These 2 drives are not mounted so if you try this be real careful moving your Mac around!
If you notice, you might be able to squeeze one more drive under location #2? You also have the stock IDE cable unused and the SCSI cable in the upper bay unused so you have options :)
Swap Floppy drive for a ZIP drive 11/1/2000
Jordan sent me this pic a long time ago but I never got around to posting it :( Sorry Jordan. Anyway he created what Steve Jobs had invisioned a 6400 should look like. Floppyless :) Thanks. Sorry I don't have any info on how he connected it up inside?
Yamaha CDRW drive installed 11/3/2000
Roque writes that he was able to install a Yamaha CDRW in the stock CD's location with minimal customizing. He later moved it to the upper bay and cut the bezel out as I did. I think he did a better job :) If you look close at the original CD location, you will see that he had to file the upper corners a bit to make the CDRW drive fit. Yamaha's tray door is trapezoidal shaped instead of plain rectangular shaped.

Adding a jack to run an external subwoofer instead of using the internal speaker 2/24/2001
Rod sent me some instructions on how to install another audio out jack that lets you run an external subwoofer being driven buy the 6400's stock audio amplifier. Thanks Rod.
With this jack you can either have full sound being played to a set of external speakers without needing to run a cable from the front headphone jack or you can plug highend speakers to the regular audio out jack in the back and then run a subwoofer speaker from this new jack. I think Apple should've done this in the first place :)
Dual power supplies in a 6500! 3/10/2001
Well you heard it here first. Rick sent me some info on how to install a second power supply to help alleviate the load on the original power supply in hopes of gaining more stability. In Ricks case, it worked! Click here for all the details. Thanks Rick.
Painting your 6400/6500 4/7/2001
Andre sent me a pic of his 6400 with a very cool paint job. He also sent some instructions on how to do it. Thanks Andre. Click here for more info.
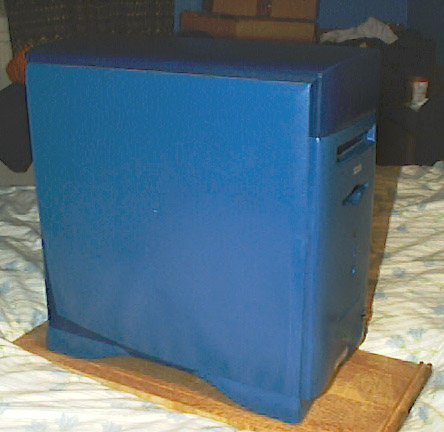
5/23/2002 Chrome 6400 case: Matthias sent me some pics of his girlfriends 6400 painted in chrome! Thanks Matthias.
- [Hi, are you interested in more pics of brushed 6400's ? Here is my girlfriends 6400 in chrome-style.... :-)
for better a look I have bought a black Next-Keyboard and a black apple mouse (ebay)...
The most work was taken by opening the monitor-case.... :-)
byeee
---
Matthias]
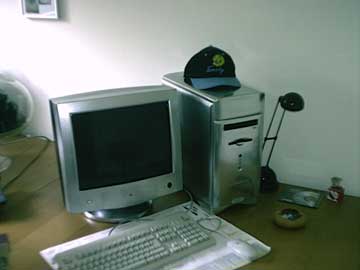
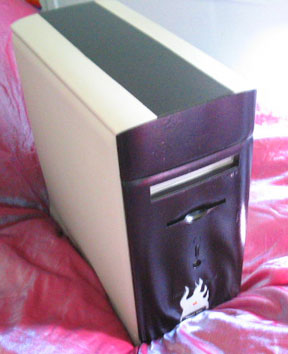
12/22/2003 Painted Mac, Black Stripe: Patrick sent me some pictures of his Mac that he painted. Thanks Patrick.
- [Well here are the pics, I thought I'd send them all so you can pick the best one's. As you can see, I was going for understated, but still very awesome, style. It was originally just one long black stripe, but that really wasn't enough! The Power Mac logo is cut out of a PM G5 brochure, as the original Performa 6400/200 badge both didn't agree with the computer(a 6500/300), and was the wrong color. Enjoy! :)
Patrick]
I would love to see any other decorated 6400/6500's out there as well :) Thanks
6500 G4 mother board mod! - Project Steeltooth 12/16/2002
Well, Adam took a 6500 to the extreme or downgraded a Gigabit G4 depending on how you look at it :) He sandwiched a G4 mother board inside a 6500 case. Check out the link below for all the details. Thanks Adam.
- [Long story short, I made a G4 with a 6500/275 case... thought you might put the link on your site - I think it's pretty interesting http://www.sit.wisc.edu/~ajgill/steeltooth/
laters adam]
Hack to get little lights power by your USB ports 1/9/2003
Elijah sent me some info on how to use a USB cable to power some little lights for possible use as Christmas lights around your computer. Thanks Elijah.
- [Hi Tom,
I recently saw an USB light for laptops for $30. I wanted one of these lights (to go on top of my monitor at Christmas!! :) ), but I wasn't going to fork out $30 for a little light. I asked the store assistant if I could have a look at it, and I saw that only one prong was being used. I got home and tested my USB port and found out that prong one was live and the metal outside negative. I wired 9 x 50MA (milliampere) 6volt bulbs together in parallel (any more than 500ma will fry your Mac or hub) and put the live on prong one and negative on the outside (with sellotape!). The lights lit up!! They looked cool! They are making my monitor look all Christmassy! If I ever want to use the USB cable I used, all I have to do is remove the sellotape!
If you would like to make a light strip (as I call it) follow these instructions:
1) You will need a USB cable (preferably the square connector) and spare USB port.
2) Put the negative onto the metal part of the connector (be careful not to touch any of the prongs inside with the wire
3) Put the live on the top (the top is the side with the USB symbol on it) left corner prong (my one has a little arrow next to it). You may need to cut out a piece of paper and slot it in the connector to stop the wire touching the other prongs.
4) Link up maximum 10 x 50MA 6volt bulbs together in parallel.
5) Plug your new strip lights into your USB port.
6) Switch on your Mac and hey presto! A USB light strip!
The enclosed Appleworks presentation helps show how you make the light strip. {I changed it to a single gif image - Tom}
Sorry but I cannot take any responsibility for anything that goes wrong, or if you really mess things up because of the light strip.
I hope someone else tries it!
Thanks for the brilliant site, Tom! If it wasn't for your site I wouldn't be getting an ATI Radeon 7000 graphics card! Thanks Again!
Elijah]
As Ehijah states, PLEASE TRY THIS AT YOUR OWN RISK! It could damage your USB card and even your mother board if things go wrong.
12/22/2003 USB lights by Elijah: I had posted about a year ago I posted some instructions from Elijah on how to make a string of little lights work off of the power of a USB port. Now he sent me some more detailed instructions on how to do this. Thanks Elijah. Click here for more info.
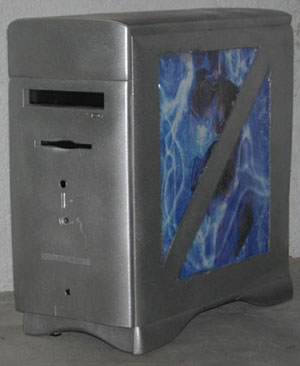
6400 "Diamonds" 2/28/2004
Mark sent me a link to his web site where he has info on how he modified the appearance of his 6400. And it is truly modified! Thanks Mark.
- [Inspiration: good question. Too much time at Applefritter.com and Modyourmac.com I guess.
I don't remember what order the ideas came in but the whole thing is emulating other hacks and mods I've seen online. Windows, paint jobs, and CCFTs are pretty common in desktop systems for both Macs and PCs. The insert idea came from the various G4 Cube and clear iBook mods out there with paper inserts. Blue Smoke Squared comes to mind first. I don't like simple one idea projects (no challenge) so I combined a few ideas then when I finished set it up as a computer for my brother.]
Return to The 6400 Zone Home page
This page last updated 5/25/2004

